So often our decor is in need of a little “umpf”. I mean, all the decor staples are great: moss balls, twine balls, books, vases, etc., but sometimes our decor needs some life to bring it to life, as it were. It needs something real. Something like flowers! Flowers help to add color, bring life so our decor doesn’t look so staid, and add interest by filling out vases we may be using in our decor. But, there’s a dilemma—do we use fresh or fake?!
Fake Flowers
Fake flowers (or faux flowers if we want to sound fancy and up a scale) are nice because there are some gorgeous, very realistic ones on the market. The downside is that nice faux flowers can be quite pricey and if you aren’t sure they are something you want to use for years it might be better not to splurge on them. On the other hand, fresh flowers can be found quite affordably, they last for a while, and can even lend a pleasant aroma to the room. The downside is they don’t last forever and, therefore, every 7-10 days will require switching out. For me this can become a bit of a chore and, quite frankly, I don’t want to have to do that much upkeep all the time.
Third option
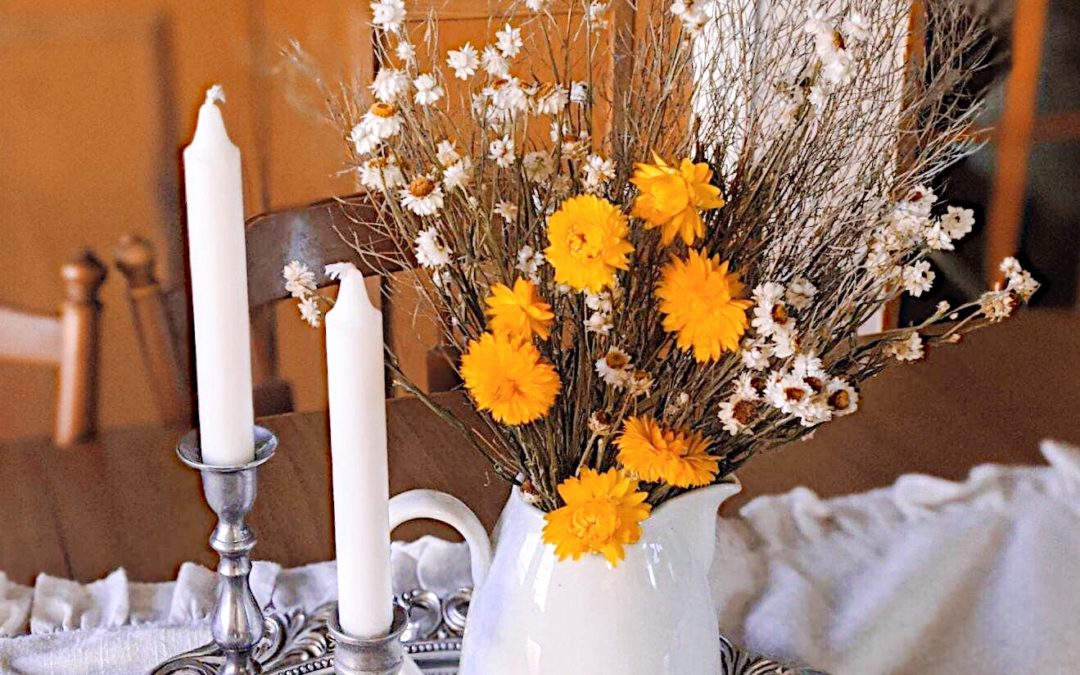
There is, however, a third option that I do not hear talked about nearly enough—dried flowers! Dried or preserved flowers are a great way to, ironically enough, add life to your decor. Since they have been preserved, you can typically count on them lasting you 1-3 years so you don’t have to worry about looking over, 15 minutes before guests arrive for that dinner party, and realize that you have a vase full of dead, drooping flowers! And, you won’t have to have that conversation with yourself of whether your fake flowers look fake.
Preserved Flowers
Another reason to love preserved flowers—they are so versatile. A bunch of dried lavender lends itself well to a midcentury modern feel. Some dried flowers in a milk pitcher affects a country farmhouse air. Add any colorful dried flower and watch your bohemian/eclectic decor crackle and pop with life!
There are many different ways to incorporate dried flowers and the other nice thing about them is that no two are exactly alike! Since these are real flowers, grown, cut and dried, they include all the abnormalities and inconsistencies found in nature, which to my mind, makes them even better!
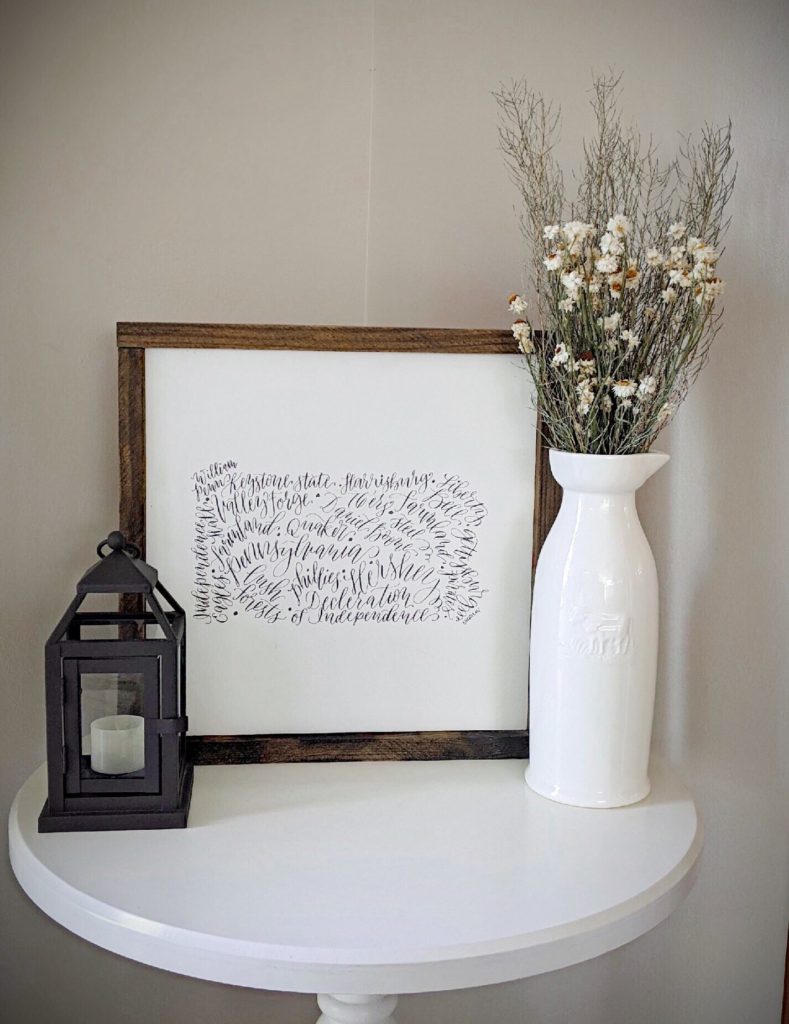
I have talked about using preserved flowers in vases, but get creative! I have an old window that has dried flowers preserved inside. You could also scatter a few blooms on a tray containing a vignette. (Unless you have cats—in that case skip this unless you want to have dried petals floating throughout your house. Not that I would know from personal experience. . . .) The point is that the possibilities are endless! What a fun, but uncommon element to add to your decor.
Where to find these flowers that will transform your decor? I found mine at a local specialty store called, “Roxanne’s Dried Flowers;” so do a little research, see if you have a store near you, and make a little field trip out of visiting it! If all else fails, like everything these days, there are a lot of options online, and on Etsy too.
In my opinion there is one dessert that is as perfect as perfect can be and that is a perfect chocolate chip cookie. It’s a versatile dessert that you can take to picnics, to parties, for a snack, and even to serve after a dinner party. Chocolate Chip Cookies are all American staple- but not all chocolate chip cookies are created equal. Some people like a crisp cookie, some like dark chocolate chips, others don’t like many chocolate chips,( I know, I don’t understand that either!) and then there is the ultimate perfect chocolate chip cookie. For me the perfect chocolate chip cooking is chewy, slightly crisp to bite into and then soft chewy goodness the rest of the way. Not too thick, but not thin either. After many years I have the audacity to say that I have finally perfected my definition of a chocolate chip cookie.
Backstory
A little backstory before the recipe. My grandma, Velma Marie, always had a cookie of some sort on hand, and I think the one and only time she ran out of cookies,( for only afternoon mind you,) she counted as one of the biggest failures of her personal life. For her homemaking was not only a profession but an art- one she took very seriously and a potion which she respected. But back to the cookies, she had primarily two varieties that were always on hand- chocolate chips cookies and ol’ Henry Bars. Her chocolate chip cookies were very good but usually more of the crisp variety. I remember baking cookies with her at a young age, listening to her tell me of when chocolate chips first came out and that her mother refused to buy them- they were too expensive and the Great Depression was way too fresh in everyone’s memories to spend money on something like chocolate chips! I started to play around with the cooking temperature to see what produced a softer chewier cookie, without getting it dry. I also talked my mom into getting milk chocolate chips instead of semi sweet- what a difference that makes too! The sweet milk chocolate lends the cookie a faint caramel taste.
While my cookies did start to earn a reputation in their own right they weren’t quite what I considered to be perfect. They tended towards dryness, and could come out a little flat. Then a little while ago I had an epiphany- cream cheese! Another cookie recipe that I sometimes make uses cream cheese and adds such creaminess to the cookie that I always end up eating wayyy too many! I decided to experiment and what I came up with is what I have since deemed the perfect chocolate chip cookie! Chewy, moist, creamy and slightly thicker than my old version, best fresh out of the oven but delicious anytime- especially when enjoyed with family.
Recipe
Velma’s Chocolate Chip Cookie Recipe *Tweaked
1 cup Shortening 2 Eggs
¾ Cup White Sugar 3 oz Cream Cheese
¾ Cup Brown Sugar 1 10 oz package of Milk Chocolate Chips
1 Teaspoon Vanilla 2&1/4 Cup of Flour
1 Teaspoon Baking Soda
Preheat the oven to 350. Soften cream cheese. Cream together all ingredients except for chocolate chips and flour. Add half of the flour, beat till combined, then add the rest of the flour. Stir in chocolate chips. Form cooking using at least 1 Tablespoon of dough per cookie. Bake at 350 for only 10 minutes. Let cool and enjoy!
*The cookie may not look quite done after only 10 minutes but if your oven is reliable to stay at a cooking temperature of 350 your cookie should be set and ready to eat after cooling.
The summer has slipped away and fall is creeping in on us. It is cooling off and while people like me are sorry to see the hot weather go, others of you may be finding yourself spending even more time outside in the sunshine! It’s good for us to be outside when we can; the sun is an endorphin booster, it helps our vitamin D levels which are very important, it’s so good for us right? Wait, what about spf, aren’t we supposed to live inside so we don’t harm our skin and expose it to harmful UVA and UVB rays? No, it’s okay to be outside without protections for 15 minutes a day so you can get your allotment of vitamin D for the day…And so the arguments go, there are many opposing and nuanced views- and that is to say nothing about what kind and how strong of spf we should be wearing! Just what does all of it mean anyway?? I’m here to shed some light on SPF coverage for you- I couldn’t resist throwing in that pun!
What is SPF anyway?
SPF stands for sun protection factor. This means that if circumstances are ideal, (and when are they), you could be out in the sun for one minute would be equal to being outside for 30 minutes if you are using a sunscreen of 30 SPF. In theory at least this is how it works. The SPF is filtering out the harmful UVA and UVB rays. It is very important to make sure your sunscreen is filtering out both UVA and UVB raysor one that is broad spectrum protection.
Understanding How SPF Works
The. Higher. the SPF. The. More protection. However this doesn’t mean that by applying and SPF of 60 rather than 30 that you are covered. According to the American Cancer Society’s website it’s more of a sliding scale with an SPF of 15 filtering 93% of harmful rays, 30 filtering 97%, 50 filtering 98%, and SPF of 100 filtering about 99% of harmful rays. No sunscreen filters out all harmful rays. It is generally recommended that for normal everyday activity you use at least 15 SPF and at least 30 SPF for days when you will spend a majority of your time outside. Just because you are using a high SPF doesn’t mean that you are suddenly impervious to the sun’s rays. If you opt to go for a higher SPF treat it the same way you would a lower SPF to make sure you are getting the full benefits of using a higher level.
What is the difference between UVA and UVB rays?
UVA rays are the rays that make you tan and the rays that will result in early signs of aging. UVB rays are the ones that make you burn.
Different types of SPF
Now what are the different types of SPF? There are two major categories- physical and chemical spf. The physical rays work by scattering the sun’s rays before they touch your skin. Sunscreens that contain the ingredients Zinc Oxide, or Titanium Dioxide are physical sunscreens and tend to work better for people with sensitive skin.
Chemical sunscreens work by absorbing the rays from the sun before damaging your skin. Avobenzone and Octisalte are typical ingredients in chemical sunscreens, and a lot of sunscreens are a combination of both physical and chemical ingredients.
How to Use and Apply SPF correctly.
As I mentioned above if you choose to use a higher SPF, (such as 50 SPF or higher), treat it as you would an SPF of 15 or 30. To apply you should use at least an ounce of sunscreen, as much as a good palm full or a shot glass full. No one wants to feel greasy all day but in order to make it worth while you need to make sure you get solid and even layer over your skin. An uneven layer will result in easier burning. Next make sure you are reapplying every 2 hours, or every 80 minutes if you are swimming or heavily sweating; yes this is a pain but so is sunburn and cancer! Always make sure to read the directions on your sunscreen.
I hope this helps clarify what to look for in your sunscreen. Please remember this information is to help add to your knowledge- not to be all your knowledge! Be sure to do your own research and talk to a professional if you have any questions or underlying conditions!
Are you a Clean Slater or a Transitioner? Let me explain; a Clean Slater is someone who keeps all their decor the same throughout the entire season. They put all their fall stuff up, they take it all down and put all their Christmas stuff up. A Transitioner is someone who around now starts itching to pull out their fall stuff but it might seem a little early to them; they don’t want to pull everything out so they pull out a few things, little my little. I know for me here in Western Pa, I can really struggle to pull out the fall decor before it gets cool outside- I don’t want summer to think I’m rushing it away! We usually enjoy warm weather, or at least warm-ish, until the middle of October and while September is back to school and the leaves start to change, I usually end up vacillating back and forth until the 3rd weekend in September, when I break down and pull out my fall decor. (The third weekend is the actual start of fall according to the solstice.)
But no matter when you decide to officially transition over all your decor; you can start to sprinkle in decor of the coming season with a few simple “hints” of what is to come. Just like outside it is nicer when there are hints of the coming change rather than an abrupt out with the old and in with the new.
Change Out your Door Hanging
I like to start with changing out the wreath on my front door because it is what people see first. Setting the tone upon entry to your house makes a good first impression and sets the expectation for what will follow on the inside. This doesn’t mean just for visitors either- you get to enjoy a lovely first impression of your house too! Its like your house is saying, “Welcome Home!”
Fall flowers
Maybe you decorate with fake flowers- maybe you decorate with real flowers- either way fall is a great time to grab a few mums for outside your door, or a bouquet of sunflowers to add some color inside!
White Pumpkins
I tend towards the traditional side of things when I’m decorating so I enjoy the classic fall colors; I like the reds, golds, oranges and creams rather than a muted palette of white, green and blushes which have become popular over the past few years. I think these new colors are lovely- they just aren’t quite what I love right now! But regardless of your specific color scheme I think white pumpkins scattered about your decor add the perfect “not too fall” fall touch to things.
Fruit Can be Decor!
Apples arranged in a tiered serving stand, Brussel sprouts and fall squash in a big dough bowl or tray, the options and combinations are limitless when you start playing with decor that you can also eat!
Moss Balls, Pine cones and Acorns- Oh My!
If you have used some beautiful moss balls to add color to your decor don’t feel the need to take them down right away! Instead add the feel of fall but tucking a pine cone or two into your vinettes. Scattering a few acorns on a surface will also help add hints of a coming season change.
Add a Throw
As the weather, for us in the north at least, starts to cool off and the days take longer to warm up it is time to pull out a few throws to warm up your decor. Adding a plaid throw will definitely speak of fall, but also try adding some striped throw, and keeping the texture more of a cotton or linen. This will keep your decor from looking too warm and wintry.
Pillows
One of my favorites! Who doesn’t love a cute fall pillow? If you’re hesitant to pull out the pumpkin and fall pillows then follow the same rule as you did for throws and either pick a plaid or a solid in a fall color; gold, orange, red, deep magenta or navy- any super saturated color will get the message across that we are no longer fully in summer anymore! Come join me on Instagram at @essentiallyemmamarie or share some photos by sending me an email at essentiallyemmamarie@gmail.com. I look forward to hearing from you and in the meantime- happy fall y’all!
We have reached the time of year when we can fall into a little decorating slump- at least I know that this is the case for me! It seems the summer has peaked, the 4th of July is over and before we know it school will be starting up again and all the summer fun that we didn’t get to this year, will have to wait until the next year.
I find myself getting a little stuck in my decor at about this time- it’s wayyy to early to pull out stuff for fall but things need a little freshening up now that summer is halfway through! Here are three things to ask yourself when you’re feeling a little stuck in your summer decor.
1 Is Your Decor Stale?
If you tend towards Americana themed decor for Memorial Day and Independence Day, then you may just need to take a look around and take down a few things. Yes, Labor is still coming but you can always pull out a few Americana pieces as a mini refresh. In the meantime, tuck away some of the flags and red,white, and blue pieces, and instead try bringing in some fresh cut flowers- either gathered from the garden or store bought to brighten things up!
2 Has Your Decor Gotten Cluttered?
One major perk of freshening up your decor frequently is you are better able to keep tabs on clutter that may be appearing around the edges or worse- on the coffee table! Are someone’s keys starting to always appear on the kitchen island instead of the entry table? Have you been meaning to tackle that pile of miscellaneous stuff by the front door? Take a good look around and then- attack!
Along these same lines keep an eye open for any new items that you haven’t found a permanent home for yet and thus, stay perched in a less than optimal spot. If you haven’t found the right spot for that really cool vase you found at the flea market yet- its ok! Just tuck it away until the moment when the right spot jumps out at you and you wonder why you never saw it sooner!
3 Move Things!
It may not even be changing your decor that you need to do as much as moving it! If you decorate with greenery, flowers, and relatively season neutral decor, the secret may lie in rotating a select piece or two from one room to another room. Get creative! Try swapping pieces out of two vignettes with each other! Go through your house and try switching one of the pictures or items that you have on the mantle with an item in your entryway, and swap the picture in your entryway for the one on your dresser that you would like to see more. Just mixing up the decor you already have will make things feel fresh!
Lastly curate your decor that you have out. Was there something that you did when you were pulling out the summer decor that you weren’t crazy about but left it because you thought you might need to get used to it? If it hasn’t grown on you yet, then it’s time to change it. Sometimes it pays to walk away from a tough decorating area for a couple hours or a day. But when it’s been weeks on end and it’s still not working- it simply isn’t going to. This can be key for a situation. I think it is true both for myself and others that we have a tendency to over decorate. I even heard of one decorator who after working on a shelf or vignette would then step back and take away at least 2 items. Try it- I know doing this has helped me out of many a difficult decorating spot before! And it’s also okay not to have all of our favorite items out at one time; putting them away and rediscovering them later will bring a joy of its own!
I hope these tips help inspire you to get creative, play and above all, have fun with your decor! I’d love to hear from you, see pictures of what you tried and hear other tips you may have! Email me at EssentiallyEmmaMarie@gmail.com, or meet me on instagram- I look forward to hearing from you!
In my first career, or as I say- in my first life, I was an esthetician and cosmetologist. I absolutely loved practicing skincare! Helping people with their skincare concerns and providing relaxation was so rewarding. I loved being peppered with questions from my clients. Before too long though, a recurring theme emerged. Clients would ask; “If I do one thing for my skin, what should it be?” Or, “Where should I start??”
There are a lot of factors that play into good skin, and there’s so much out there telling you to do this or that, so much information about a myriad of products out there, but when you boil it all down there are several basics that can make a significant difference to your skin.
Establish a Routine
I had so many clients tell me that they started using a new product, but only used it for a week. They would say they were washing their face twice a day but were breaking out so they stopped after 4 days. Your skin needs a routine. Our bodies regulate our oil production, at least to a certain extent, based off how much oil is being stripped from them each day. If you wash your face twice a day 3 days, then none, then 3 times on another day your skin is not going to know what is going on. It’s ok if not everyday is exactly the same, this is life after all, but being consistent most days will help tremendously to regulate your skin. I recommend washing your face in the morning and evening. If you can only do one of these then I recommend washing your face in the evening to remove all the dirt from the day. Just like your teeth, leaving your face uncleaned in the evening gives the grime a chance to settle in and do more damage over time.
Use SPF!
Please, please use sun protection. Whether in your makeup, or as a stand alone product it is essential that you protect your skin. Even if you’re someone who doesn’t spend a lot of time outdoors, all the moments walking from your house to your car, to the office, and store, all add up over a lifetime. In addition if you have children please make sure you are using a SPF for them as well. I heard a statistic once that stated that out of all the harmful UV rays we will ever absorb, two thirds are absorbed before we turn 18! Yikes!!
Drink Water
I know we hear this everywhere but it really is true that our bodies need water, and usually more than we give them on a daily basis. Just like every other organ in your body your skin needs water to keep it functioning at its best, to filter toxins, and keep it plump and healthy!
Double Cleanse Your Skin
Not everyone is familiar with a double cleanse but it was a game changer for me! Most of us use one cleanser that may or may not target a specific problem. But say you are using a cleanser that is supposed to help target signs of aging as well as clean your skin- how effective do you think it can be when it has to first cut through all the makeup, sweat, and other grime on your face? That’s where the double cleanse comes in!
When doing a double cleanse the first cleanser, often called a precleanse, is usually a gentle, non drying, and often oil based cleanser to first remove all the heavy dirt from our skin. Using the correct precleanser will not dry out your skin. Once you have used the precleanse, follow with your targeted cleanser and proceed with washing your face. By doing this you are allowing your targeted cleanser to work at its full strength, and therefore better treat your skin. Makes sense right?
Use a Moisturizer
Use a Moisturizer- even if you have oily skin! First: oil and moisture are two different things! Oil is produced by your pores, water is absorbed by your cells. You may need a moisturizer called a hydrator if your skin is deprived of water and needs a boost. If you have oily skin and are using an aggressive cleanser to clear the oil out of your pores your skin can then feel dry and signal to your sebaceous glands that you need more oil produced. By using the correct moisturizer you can then replenish the clean pores with the appropriate amount of moisture and therefore hopefully avoid kicking your glands into oil overdrive! By applying a moisturizer that is right for your skin, you help give your skin moisture it needs- keeping it plump and healthy! Not all moisturizers are created equal so it is important to find one suited for your skin; use a lightweight one if your skin is oily to still give it a chance to breathe, or slightly heavier one if your skin is on the dryer side. Look for a moisturizer that is non-comedogenic, that has been formulated not to clog pores.
Change Your Skincare Seasonally
Just like changing our wardrobes according to the season so our skincare should change slightly season to season, and that goes for certain cosmetics; such as foundation and blush too. Most of us will need a lighter weight moisturizer in the summer, when it is warmer and we are more likely to perspire, than we do in the winter when the air is so very dry. I usually go for a slightly stronger cleanser in summer as well.
Exfoliate
Exfoliation is something that people tend to either do way too much of, or none at all! Just like the double cleanse, exfoliation helps to remove the top layer of dead skin, as well as doing a deep clean on our pores. Also as we age our natural skin turnover starts to slow down making exfoliation even more critical. There are many types of exfoliants out there and I will do a future post for the different types, but regardless please do your research or talk to a professional to find the right type for your skin!
How often should one exfoliate? That depends on the individual, age, and type of exfoliation being used. I would say once a week for anyone around the ages of 14-18, 18-late 30s I would say around 3 times a week, and 40s and up I generally recommend 3-5 times a week. Again those numbers depend on many different factors so please do your own research and talk with a professional. If you see any signs of your skin drying out or starting to peel, decrease the frequency, and if necessary downgrade the strength of the exfoliator as well.
Stick With It!
Last but not least whatever routine you decide to establish- stick with it! It usually takes your skin 3 weeks to a month to regulate to a new pattern. This doesn’t mean if you get a few breakouts in the first 2 weeks that your product or routine isn’t working. Oftentimes breakout will occur as the buried dirt is brought to the surface. Habits take time to develop and by sticking to a routine for a month you are truly giving your skin the fair chance it deserves! Of course if you experience anything truly uncomfortable like a rash, flaking peeling, or extreme redness discontinue use of any new product right away and consider seeing a physician. But if you are experiencing relatively minor changes in your skin then persist and give your skin time to adjust and improve!
I hope this helps give you a jumping off point for your skincare! In the meantime I’d love to hear from you- what has worked, or not worked for your skin? What questions do you have? What are your current skincare struggles? Let me know and if I can I’d love to help!