In my last home making post we covered some home making trends; but what if you are still stalled on ideas of how to create your own fall vignettes? What about if you aren’t an orange person- what about neutral decorating ideas? In this post I am sharing several decorating ideas of how you can create neutral vignettes and centerpieces.
Color Palettes
You all know I love a good color palette and in my post Fall Decor Trends and Decorating Ideas for 2023 I shared a few sample color palettes for some of the bold colors that are on trend this year.
Try using a color palette of:
Black, White, Cream, Gray and Beige
Cream, Light Sage Green, White, Dark Green, Light Gray
Dark Brown, Amber, Cream, Wheat, Sage
Things to remember when creating a vignette:
Bring a sense of cohesiveness
Vary heights
Vary textures
Use an odd number
A sense of cohesiveness
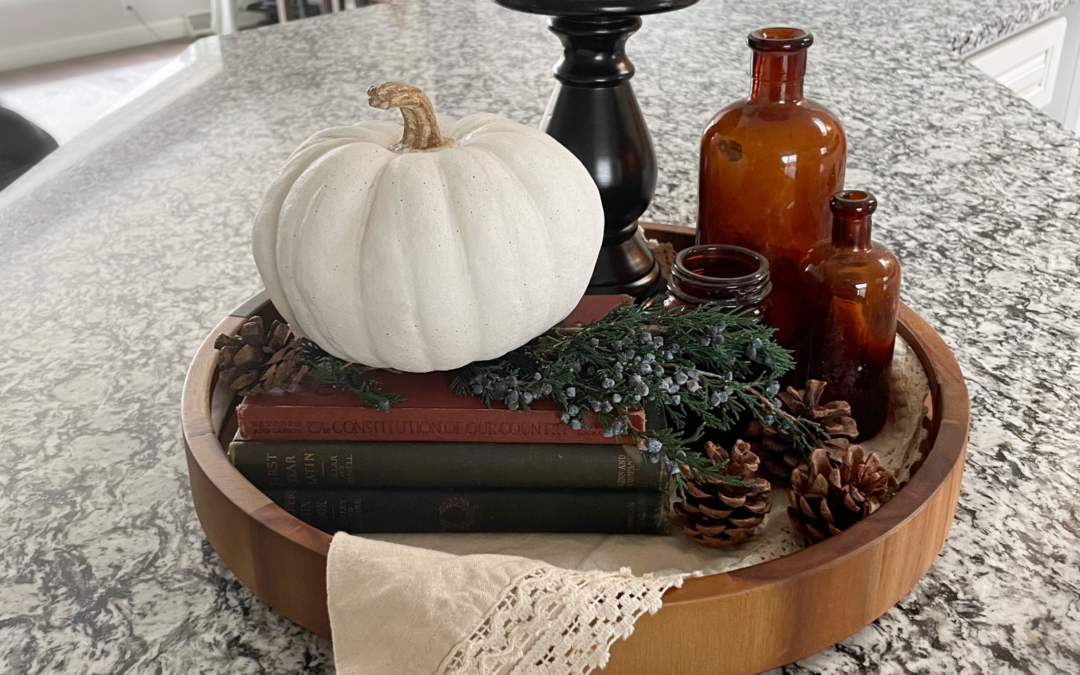
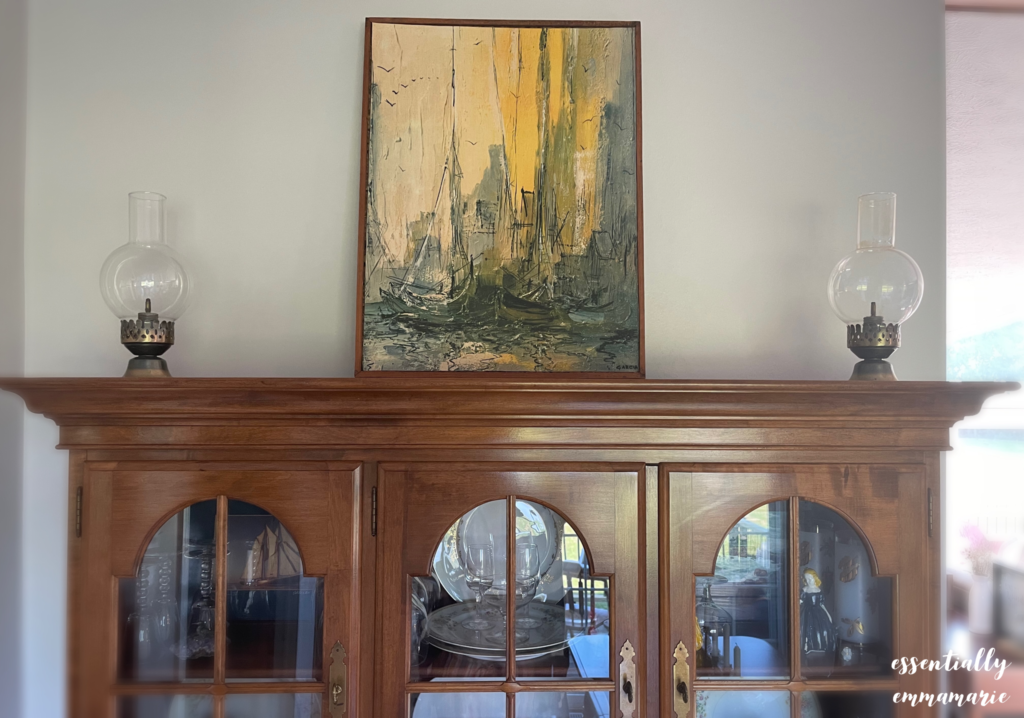
Like the amber bottles in the picture above you want to make sure you have some through line or something that brings the elements together. If you have a bunch of plants, are they all in similar color or material pots? If you have picture frames, are they similar at all? Wooden or brown frames? Coordinating one or two elements from your vignette will help pull it all together.
Use an Odd Number of Items
Generally using 3-5 items, or collection of items that read as one item, in a vignette is a safe rule of thumb. If you are using books and then set a candle on top of them that will usually read as one item.
Vary the Height
You want your vignette or centerpiece to look like a picture or landscape- you want peaks and valleys as well as flat connectors. In this vignette; I have the teal color to act as a through line connecting the different elements. The wood of the picture frame blends with the wood of the tray. The little plant adds organic life to the vignette, and a small blue pottery tray in the front of the vignette acts as a small bridge to let the eye rest as it takes in the whole vignette.
Vary the Texture
Use a variety of textures- you don’t want everything to be super smooth or very rough. You want it to be a nice variety for your eye to take in.
Ideas
Try creating a vignette using different levels of pillar candles or candle sticks in front of a mirror or painting to create a vignette.
Use something out of the ordinary to corral your vignette like an old suitcase or briefcase instead of a tray!
Utilize boring spaces
Maybe you have an end table without much going on on it. I have one really narrow end table that I can’t fit a whole lot on, but still the space is just begging to be used in some small way. I used a pillar candlestick with a pumpkin and vintage books to make a little vignette and I love it!
Other Items to Add
Here is a list of items that always are great to include in a fall vignette:
Pinecones
Deer antlers
A candle
Vintage books
Something organic (like a small plant)
An old picture
A pumpkin or gourd
Dried Botanicals
I hope this helps to get you started creating your own beautiful vignettes and centerpieces to enjoy this fall! If you don’t already, be sure to follow me on pinterest @essentiallyemmamarie for daily inspiration!
Disclosure
Please remember that this post contains affiliate links; that means if you click on the link, I will make a small commission at no extra cost to you. It’s a way to support my blog! I will only ever share an affiliate link if I love the product and think that you just might love it too!
Hey! May I Send You Something?
If you are here, chances are you just might like my writing. (wink) If you Drop your email address in the box below I’ll save you time by emailing you the link every time a new post comes out!
If you have been following along (and if you haven’t I suggest you check out howCreating Your Signature Decor Style, Part 1,and The Importance of Defining Your Signature Style, Part 2) then you have read and followed some of the steps my two previous posts and are ready for Part 3. In Part 1, we discuss how to identify what decor elements inspire you. In Part 2, we discuss why giving your style a name is so important, and how it can save you time and money, and now we are ready for Part 3, Achieving Your Signature Style.
How to Achieve Your Signature Style
Now it’s time to put everything we have talked about into practice—this is the fun part! But before you start putting on your shoes to rush out and go shopping, let’s pause for a minute: What did you discover about your signature style? Did anything about it surprise you? Did you take time to notice what elements or pieces in your home are your favorite?
For myself, I have found that my favorite pieces are the collected ones—the pieces handed down from family and friends. It’s the art from arts festivals and crafts shows I’ve visited. It’s the unique items from crafts shows and yard sales, flea markets and antique stores that have all come together to create a style that I love, and that also feels like me. It has taken time and it will take more time to further curate my style. Along the way I’m sure my style will change, and as life evolves in our household (decorating is ataddifferent with a toddler!), certain decor elements will change also.
When we moved into our house six years ago, I desperately wanted our home to be cute, curated, and comfortable. It was none of these things for the first few years. Over the years it has slowly come to look like what I originally envisioned when we first laid eyes on it. It took time—I wanted to rush it, but you really can’t rush the collection of items that reflect your style if you just rush out to Home Goods (yes, I do love that store) or Pottery Barn.
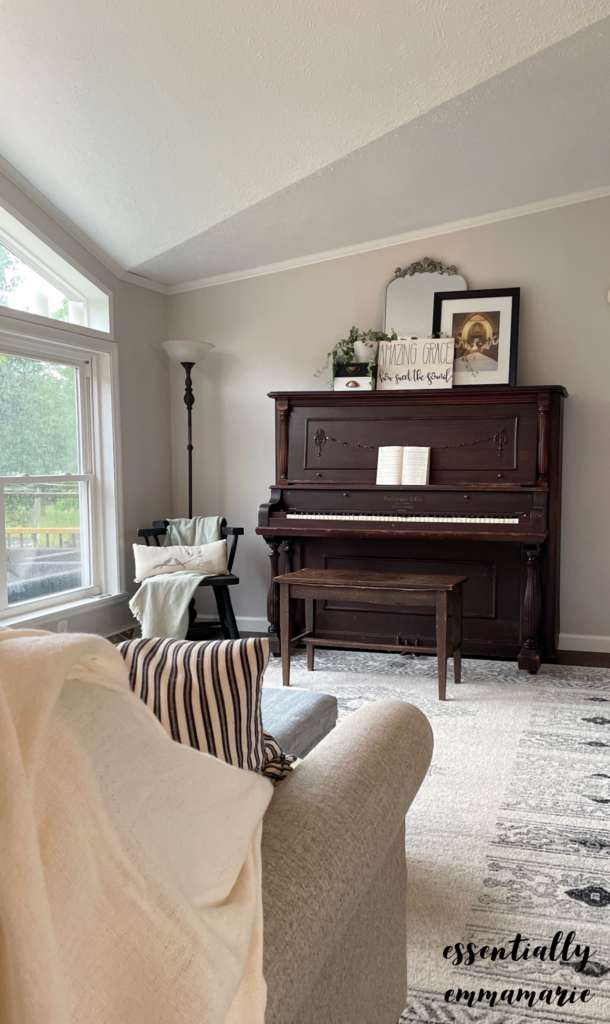
Not long after we moved into our home, my mother wanted to get rid of the piano they had. I had taken lessons while growing up, and really liked the five foot tall, slightly battered upright piano from the early 20th century. I begged her not to get rid of it and instead to let us have it. We were barely settled into our home when the piano movers were scheduled and the piano was delivered. Something really neat happened as soon as that piano arrived. My house started to feel like a home. There was something in my home that instantly felt like me, that had memories attached to it, and had a sense of heritage to it that is so important to me. I knew right away I wanted more items like this in my home.
The other thing I learned along the way is that if I want my home to have unique things collected from craft shows, or vintage markets, then I haveto goto vintage markets and crafts shows in order to stumble across these items.
How Does this Look Actionably?
The first thing to do is to go through your home and curate it. Pull out, take down, and gather everything you’re not absolutely in love with. Gather up all the items in vignettes that you feel aren’t quite working. Let your house rest.
Myquillyn Smith, author of “The Nesting Place,” and “Cozy Minimalist Home,” talks about quieting your home. She goes really far with this, even taking out furniture that you aren’t using very often. Then you wait. Live in your home for a little while, and see what you miss.
As you notice that you are starting to miss something, pull it back out and put it on display. What items are you holding onto that could go? Just because someone gave you something doesn’t mean you are obligated to keep it forever—especially if you don’t love it!
If you come across things that you love but need something to make it work, make a list! Maybe you have a gorgeous pot but no plant; maybe you have a piece of art for which you need a frame—make a list. Then start keeping your eyes open for the right item to fill these gaps—remember, don’t rush! No one is going to judge you for taking a little longer to find the right piece that speaks to you just in order to fill a decor gap.
Put Yourself Out There!
When you get a sense of the items you are missing, maybe a large piece of art, or a comfortable chair, make an effort to visit places that might just have what you are looking for. If you like craft shows, go to craft shows! If you like vintage, go to flea markets and antique malls.
Above all, be patient! Just because you don’t stumble across the perfect thing doesn’t mean it doesn’t exist!
I hope this little series has been enlightening and given you actionable steps to clarify and curate your decorating style and to create a home you love! Remember, if you have found this post helpful, the kindest thing you can do is to share this post with someone you know—this helps me to be able to continue creating these posts for you and your friend will be touched that you thought of them! Thanks in advance!
Disclosure
Please remember that this post contains affiliate links; that means if you click on the link, I will make a small commission at no extra cost to you. It’s a way to support my blog! I will only ever share an affiliate link if I love the product and think that you just might love it too!
If you are here, chances are you just might like my writing. (wink) If you Drop your email address in the box below I’ll save you time by emailing you the link every time a new post comes out!
In the last Homemaking post I shared how to find your signature style, (see that post here) and this post we are talking about the importance of defining our signature style. Why does defining your signature style even matter?? Why should you go through these exercises?
The reason to take time to find what styles, colors, and textures speak to you is so that you can create a home that inspires you and makes you come alive.
By doing these things you can create a curated home that looks like you and your style.
As to why you should define your style it is simple; if you never put a some sort of label on your decor style (you can make up a style name- we will talk about that in a minute) then you never have a guide for what makes the cut to bring into your home and what doesn’t. If you don’t have any sort of guide then your home will fail to look cohesive and curated.
Naming Your Decor Style
If you went through Pinterest you probably saw a wide range of styles including:
Farmhouse; shiplap, chippy furniture, galvanized metal
Classic; Timeless elements, sleek lines
Maximalist; lots and lots of color, patterns,and lots of stuff!
Bohemian; earthy tones and textures, woven materials, plants!!
Midcentury; 1950s-1960s inspired furniture, often shades of pea green, yellow, blue and red.
Modern; somewhat minimal, very streamlined look.
Industrial; exposed brick walls, metal, less upholstered materials.
Grandmillenial; antique store meets grandma’s house, more of a feminine feel. Lots of florals.
Now a thoughtfully decorated home should be a mix of your favorite parts of these styles; for example: I like elements of Bohemian Style, but it’s not my most favorite look, however I love the life all the plants that Boho style is known for, gives to a home. So I draw some inspiration from this style when it comes to my plant life in my house.
For me, my signature style favorite elements include:
Classic elements; I always want my home to have a timeless look.
Vintage pieces
Pops of color
Art collected from craft shows and arts festivals.
These elements all come together in a style I have named; Artsy Vintage Classic.
I could have also called it a hint of grandmillenial vintage with a modern twist. Despite what I actually name the end result is that I have a guideline for what my style is, and what comes into my home. When a friend was getting rid of their mid century buffet (originally from the 1960s) I could look at it and know that this mid century piece would fit in with other vintage pieces I have and work in my home. When I am at home goods and see a very modern piece of art that I like, I can assess if it fits into my home, and whenI decide that while I like it, I don’t love it, and it is a little modern for my style, then it stays in the store and just I come home!
Now if you, or I, see a piece we absolutely love, that makes our heart flutter and our palms get sweaty, but isn’t quite like the rest of the items in our home should we buy it? Yes!! If you love it, really love it, then there will be a way to make it work in your home.
That is part of the beauty of bringing only pieces that you really love into your home; your signature look comes to light because you are creating it out of pieces you really love and themes will emerge.
By taking the time to go through these steps; identifying and naming your decor style you will create a curated home that will always possess a timeless feel!
Disclosure
Please remember that this post contains affiliate links; that means if you click on the link, I will make a small commission at no extra cost to you. It’s a way to support my blog! I will only ever share an affiliate link if I love the product and think that you just might love it too!
If you are here, chances are you just might like my writing. (wink) If you Drop your email address in the box below I’ll save you time by emailing you the link every time a new post comes out!
Are you ready for spring? I have declared it officially spring here in my corner of the world…. Not that it really matters what I say! Regardless, Easter is this weekend, the daffodils are starting to bloom, and we are finally starting to see a few nice days sprinkled in here and there. So now that I am officially ready I have to double check—is my house as ready for spring as I am? Is your house ready for spring?
Purge and Refresh
You know what I say every time the season changes—purge! Take a good look around your house and try to really see what someone entering your house for the first time would see; do you still have scarves and mittens on your coat rack? Do you have heavy throw blankets on your sofa? Do you have your snow boots sitting by the door?
Along the same lines, how long has it been since you have had people over? A lot of times Easter breaks a long stretch of company-less days. If you haven’t had any company over a for a while, I suggest taking a look around; is the mail on the counter? A stack of returns by the door? A layer of dust in the less used rooms? This might be a good time to take care of some of the boring tasks.
Clean
We’ve all heard about doing a good spring clean and while this might not be Little House On The Prairie where a real deep scrubbing of everything is needed after winter, it is a good time to tackle some of the chores that only need done every now and then: shampooing the carpets, changing the air filters, and cleaning the insides of your washing machine, dishwasher, and coffeemaker. Check out my post onHow to Spring Clean Your Home here!
Your Entryway
What is hanging on your front door? What mat do you have down? Do you have salt stationed by your front door? I live in Pennsylvania—I know we have a very good chance of still having to use salt before summer, but it can live in a less obvious place now—I shouldn’t need it daily!
Bedding
Do you change your sheets to flannel in the winter? Depending upon where you live you could probably pull out the summer sheets. If you have a spring comforter or quilt, time to pull that out too. If some of your bedding has seen better days now is also a good time to check out what sales companies are having on their bedding.
Flowers
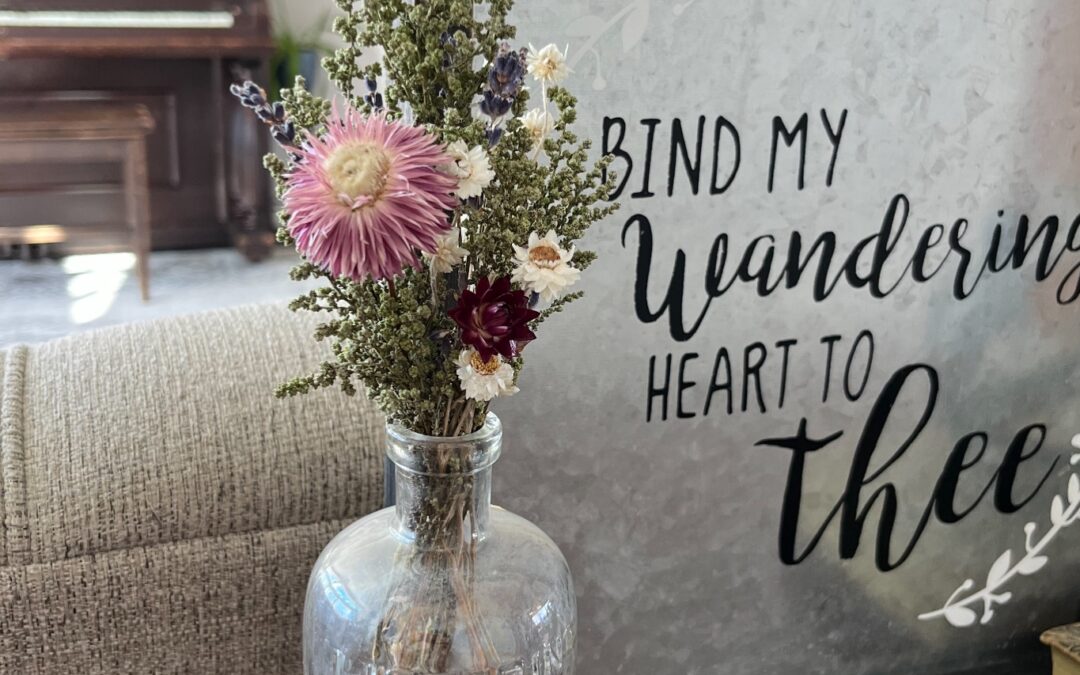
Nothing says spring like fresh flowers! Cut some flowers from your yard or pick up a cheap bouquet from your local grocery store; adding the little pop of color will really lift your spirits on the gray spring days! I also have been putting some of my dried flowers to work and they have been doing a nice job adding pops of spring color in my home!
Colors
While I recommend using a cohesive color palette(see that post here), if your palette is fairly neutral or if you are only using color in small doses, try introducing some spring colors into your home. Pastels are often associated with spring but I’m not a big pastels girl. I prefer adding extra touches of bright yellow and vibrant green to my decor instead—again flowers are a great way to do this.
Vignettes and Centerpieces
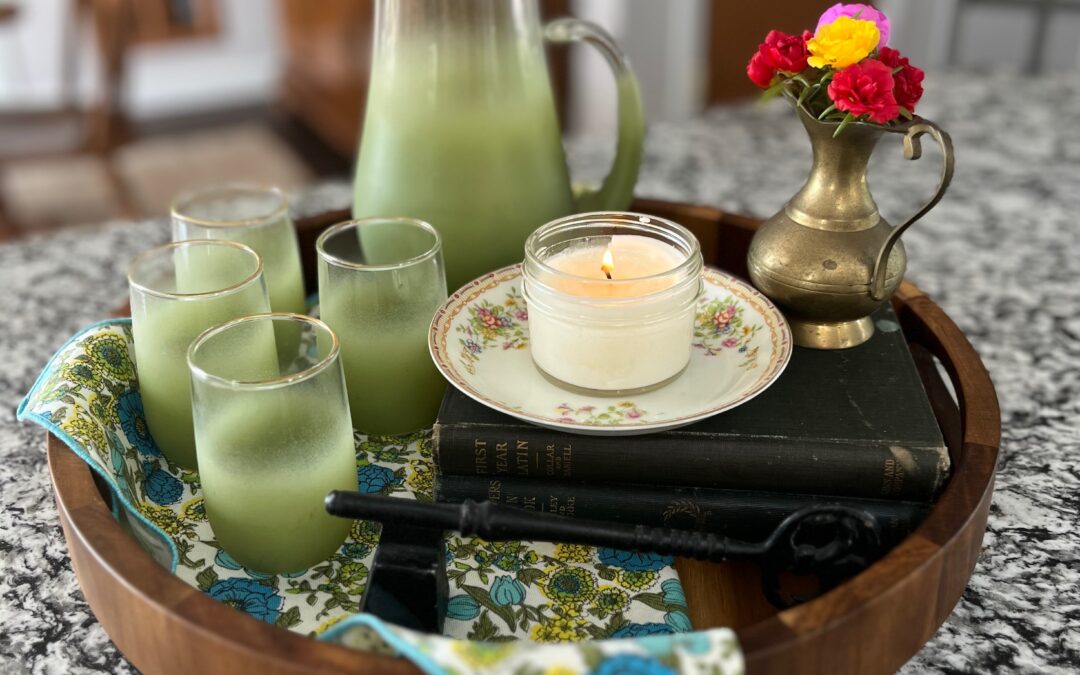
You know I love my vignettes! I love giving a nod to the seasons with my vignettes and centerpieces! For this time of year I love adding some green moss balls, mixed with pinecones and twine balls. I’ve already mentioned that I love incorporating dried flowers, as well as fresh cut flowers into my decor, I also don’t mind a bird or bunny figurine dropped into a vignette. I tended towards a more dyed down neutral color palette in the winter so I am reintroducing color by also displaying some of my more colorful serving ware!
If you are so inclined to create a spring vignette, remember these few things:
Vary height
Vary texture
Use an odd number of items
Add something organic
Corral all the items using a tray
I hope this helps to energize you to get your home ready for spring! If you know of anyone else who you think might enjoy this post, please share it with them! Even if you share this post with one person, it helps me so much and please know I really appreciate it!
If you are here, chances are you just might like my writing. (wink) If you Drop your email address in the box below I’ll save you time by emailing you the link every time a new post comes out!
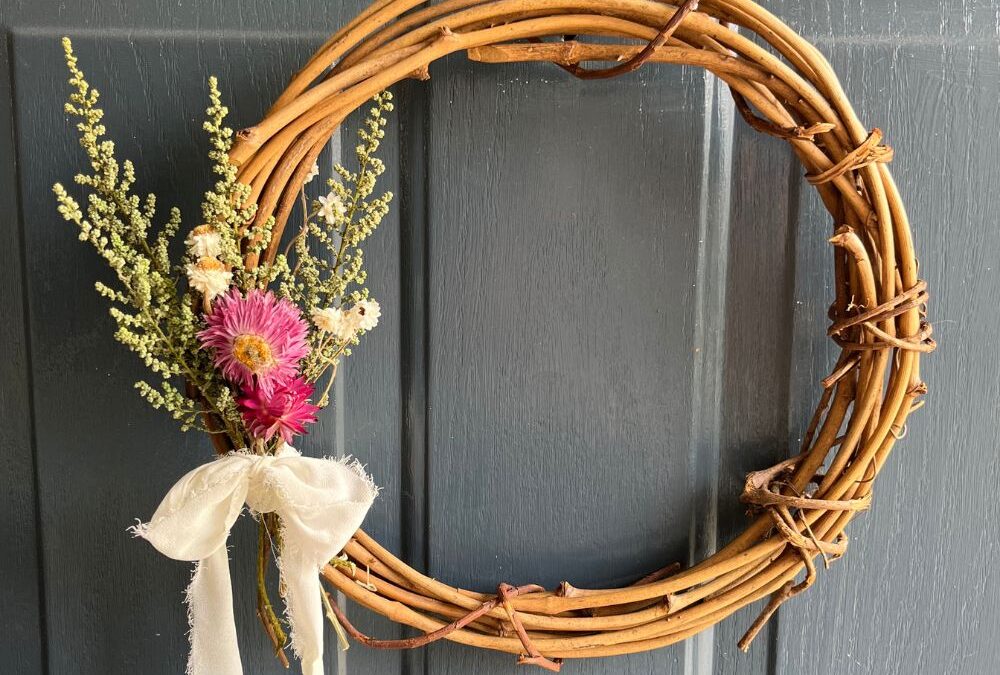
You might be ready for spring but is it your home? Don’t forget your front door! Your front door is the first thing people see so setting the tone is important! If you don’t yet have a spring wreath check out this post for how to make your own Easter wreath or spring wreath- these are super easy! One doesn’t even require any glue!
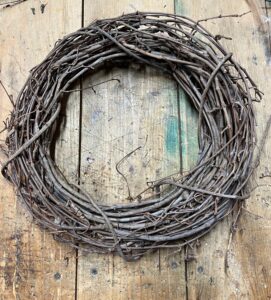
Gather your supplies
What You Will Need:
A Grapevine Wreath (mine is 12 inches)
Faux Moss
Brown Moss
3 Small Faux Eggs
Dried Flowers (if desired)
Hot Glue Gun
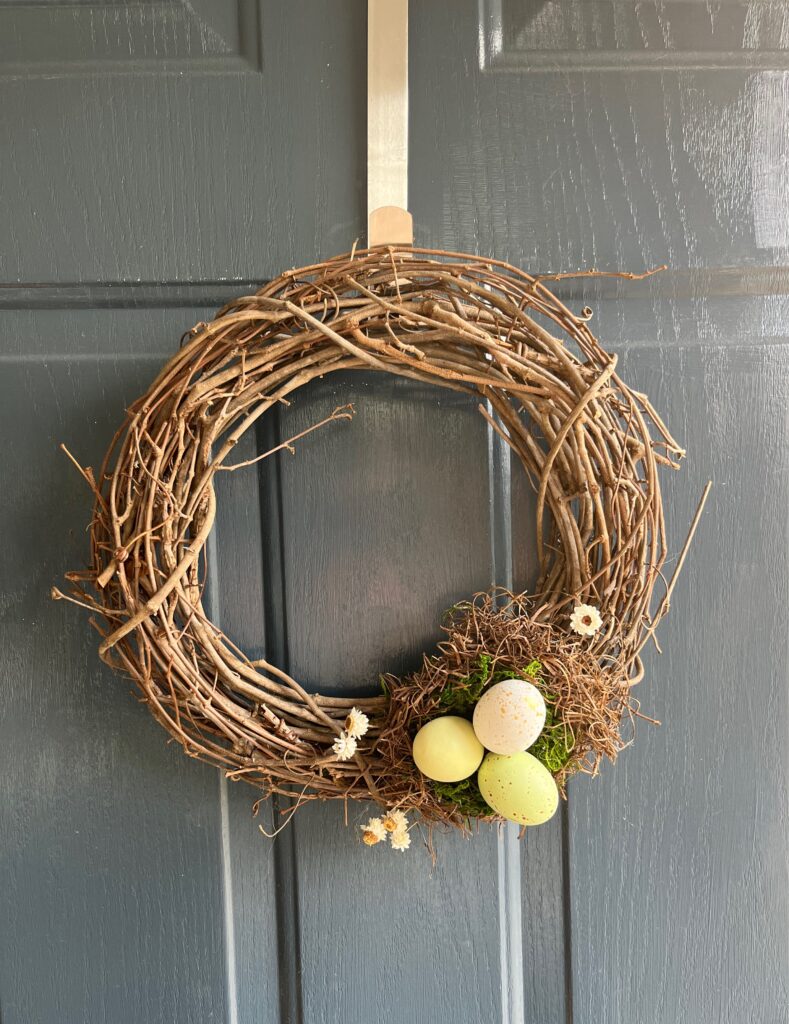
1. Decide where on your wreath you want your nest to be located; I like mine around 4-5 or 7-8 looking at the wreath as if it were a clock.
2. Start by gluing a small amount of moss onto the wreath. Be liberal with the glue- this is your foundation for your wreath and you want it to be secure! Also, use enough moss to be sufficient to be the bottom of your nest- this is where your eggs will go!
3. After you have your base as big as you want, start to build up the sides of your nest by placing a small amount of glue on the edge of the moss to build up the sides. Work your way around the edges in small chunks, (so your glue doesn’t harden before you get to it!) taking 4-5 sections to make your whole way around the nest.
4. Once you are happy with the edges and your nest you will take the brown moss and repeat the same process that you did in step 3 around your green nest base.
5. You get to glue on your eggs! Don’t forget to lay the eggs out before you start gluing to make sure that they fit the way you want them to.
6. If desired, place a small amount of glue on the end of the flower stem before sliding it into the wreath.
You’re all Done!
No Glue Spring Wreath
What you will need:
A 12’ Grapevine Wreath
At least 3 different faux flowers (or artificial)
Flower arranging wire (any wire that isn’t too heavy a gauge will due)
Ribbon
pliers
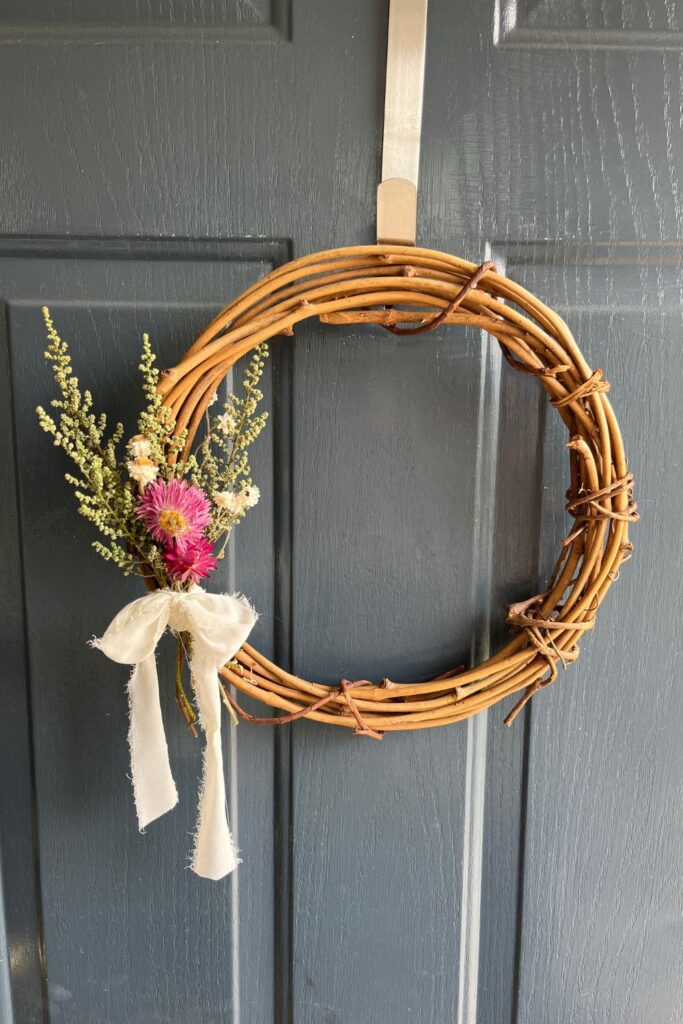
1. Cut your flowers to the length you want: I like to have my greenery or filler be the tallest, feature my main flower front and center, and tuck the little flowers around the edges.
2. Arrange the flowers how you want them to appear on your wreath.
3. Cut approximately 1 inch of wire. Lay the flowers on the wire and twist the wire closed. Use your pliers to tighten the wire so that it securely holds the flowers.
4. Place the bouquet where you want it on your wreath.
5. Cut a piece of ribbon (about 16 inches depending on how long you want your ends to be) and slide it under the wreath.
6. Wrap the right side of the ribbon clockwise around the wreath, then wrap the left side around the wreath, this covers the bouquet and wire nicely so that they don’t show.
7. Securely double-knot the ribbon, you want it to be tight so your bouquet doesn’t move! And tie a pretty bow!
8. Display your pretty wreath!
And that’s all there is to it! I hope if you are needing a wreath to welcome people into your home that this helps inspire your creativity and that you can have fun creating your own wreath- happy spring!
Hey! May I Send You Something?
If you are here, chances are you just might like my writing. (wink) If you Drop your email address in the box below I’ll save you time by emailing you the link every time a new post comes out!
Unless you have unlimited time and wealth you probably want to add at least a few elements of classic style to your home—why? I’m so glad you asked…
Why Add Classic Elements to Your Home?
Why would you want to add classic decor elements to your home? To make your home timeless. You may not identify as someone who has or desires classic style; maybe your style is more Boho or Eclectic —that’s fine! Many Eclectic or Bohemian-style homes have several overarching classic elements to them. By adding a few classic elements to your home, you will save yourself the headache of feeling the need to switch everything out every few years. Some classic elements are big things that will save you money in the long run and some are small things you can add today to help tweak your home’s decor.
Light Walls
Deep, saturated, wall colors are in right now but they will come and go. Painting your walls white (the most classic option) or a light gray, cream, or beige are always safe options—just keep it light, and not too yellow if you go the beige route. Light walls also give you a blank canvas to work off of as far as the rest of your decor goes.
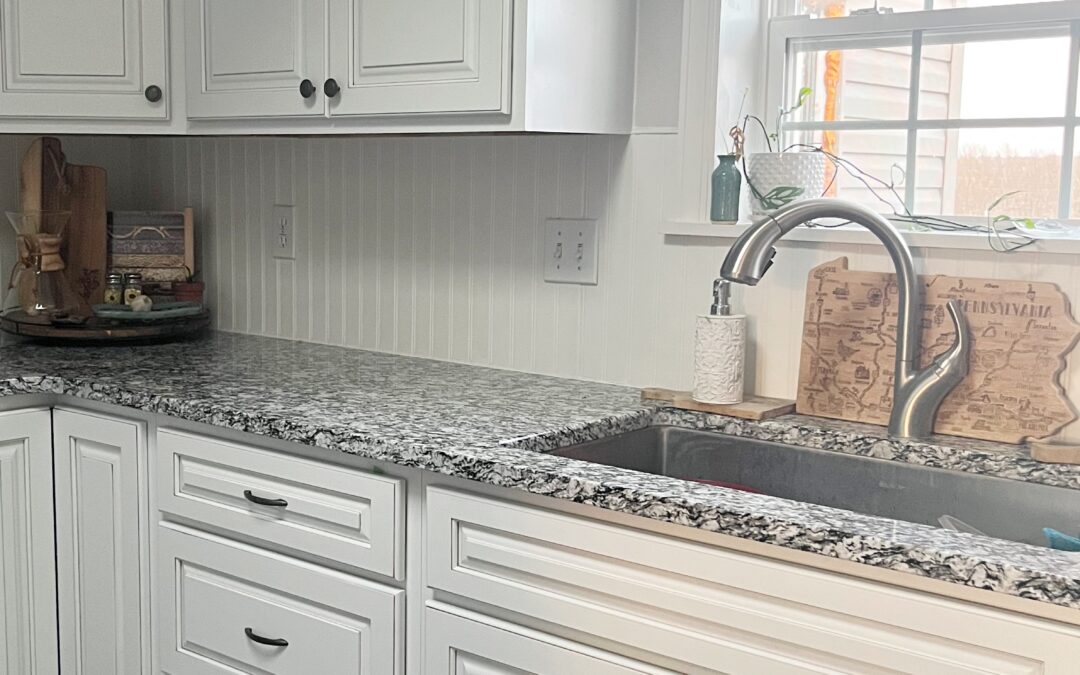
White Kitchen
Yes, I know, you think I’m biased because I have a white kitchen, but listen—if you look through magazines from years ago or from today you are going to come across a white kitchen. White kitchens may not be hot, hot, hot at the moment but how do you think the pendulum is going to swing after all these dark, moody kitchens have had their time in the limelight? A white kitchen is a classic. Another option is a wooden kitchen, but use extreme caution when choosing your cabinets. I personally would go with a medium tone, plain front, or very simple door if you are choosing a wooden cabinet option. Trending wood tones change every few years, but a classic wooden finish has some staying power. But I still think white is the safest option. 😉
Your Sofa
Velvet, pattern, stripes—these are fun options! But if you choose a big ticket item like a sofa, choose one in a gray or cream color for maximum staying power. Add color or a fun pattern in throw pillows, blankets, or even an accent chair if you so desire. These are way cheaper to switch out in several years than a couch.
Vintage
You’ve heard me say it before and I will say it again—adding vintage and antique pieces to your home will add classic elements to your home and make it timeless. There is a lot of vintage furniture out there to be had for a song! Go, have fun searching for it! And that console table your great aunt was trying to pawn off on you last week, call her back and tell her you’ll take it. And never underestimate what a coat of paint can do! After all, if someone walks into your home and can’t tell what year it is based on your decor—that is a very good thing!
Plants
Once again look through magazines from times gone by—what do you see in each room? I’ll bet that you see some green! Plants are a great way to add life, and a classic touch to any room. Check out my post, Plants that Even I Have Kept Alive, for some hardy options if you were not born with a green thumb.
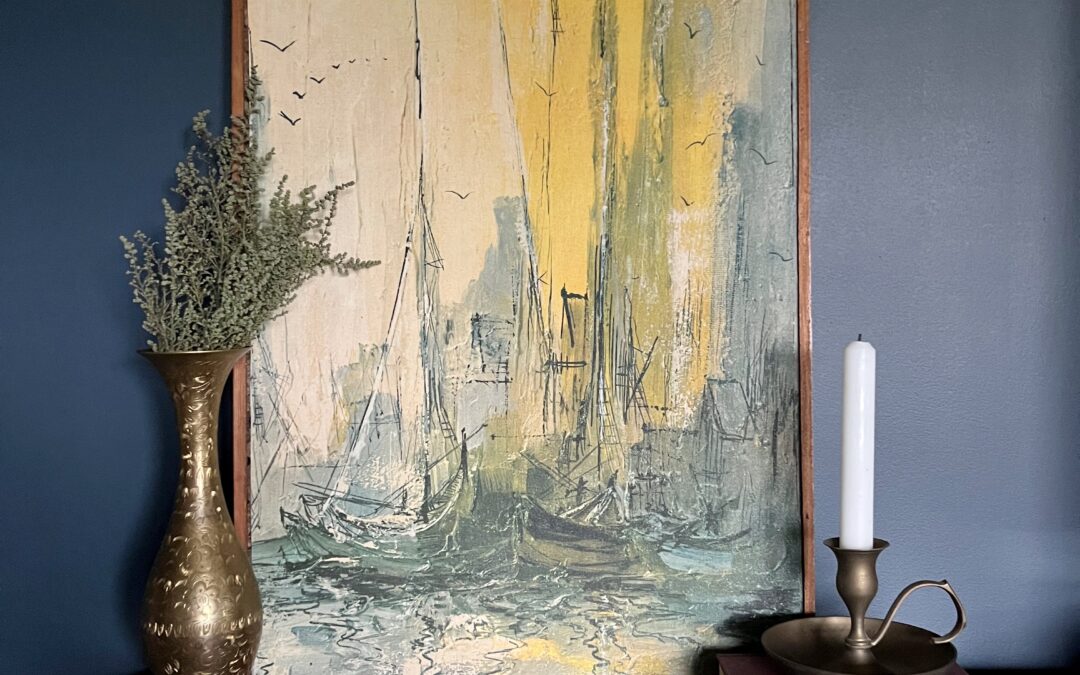
Artwork
Are you a collector of art? Do you have lots of paintings and vintage art that you don’t know where to display? Adding art to your home is another great way to add classic style to your home. A gallery wall is a great way to do this, although it can be hard to nail (see what I did there?), to get it just right. If you aren’t quite brave enough to try a gallery wall, try leaning and layering art on your mantel, the top of a china cabinet, a piano, or on a floating shelf.
Candles and Candlesticks
Candles and candlesticks are another classic element, one that you can add quite easily and cheaply to your décor. Add some candle sticks to a vignette, tucked away in your china cabinet, or in the centerpiece of your table. Don’t forget to light a candle, the scent of which you enjoy while you are doing some cooking. Take advantage of mundane tasks to turn them into something special.
Curtains and Window Coverings
If you live in a place where you don’t have close neighbors, don’t feel the need to cover your windows with curtains! Curtains are not actually made to be drawn—maybe a few of the custom-made, heavily lined curtains were, but not the cute ones you bought off of Wayfair or from Home Goods. The purpose of these curtains is merely to add depth and warmth to your home. To actually block out the light, you want shades. There are a variety of options for shades today and you can find some really sleek options that look like part of the wood frame of your window so that when your shades aren’t drawn, you don’t even know that they are there.
As far as curtains go, if you want a genuinely timeless option go with white, or a very, very light neutral. Personally, expensive curtains are not something I would spend a lot on because they are such a fun, easy element to switch up!
I hope if you are struggling to add a touch of classic style to your home, or are debating about how to redo a part of your home, that this helps give you some food for thought and some fresh ideas to start playing and enjoying your home!